A Flexible View Control for XPages Part 3 – Create a Basic View
Posted: December 19, 2019 Filed under: Bootstrap, Custom Control, DataTables, Domino, XPages | Tags: Bootstrap, DataTables, Domino, XPages 3 CommentsSee the demo live
You can see the demo created in this post here. As more demos are added to demonstrate the many features of the Flexible View Control, they too will be available online.
In Parts 1 & 2 we learned about the Fexible View Control and created the configuration we needed to get started with our application.
The Data
Now, we are going to create a view from scratch utilizing a database of 2 million records comprised of used car data.
To get started I need to add the used car database to my configuration document so the View Definition XPage can read the views in this database.

As mentioned in a previous post, and as you can see above, I’m using Bootstrap (3.4) in my application for my UI framework. I’ve already created a navigator custom control:
![]()
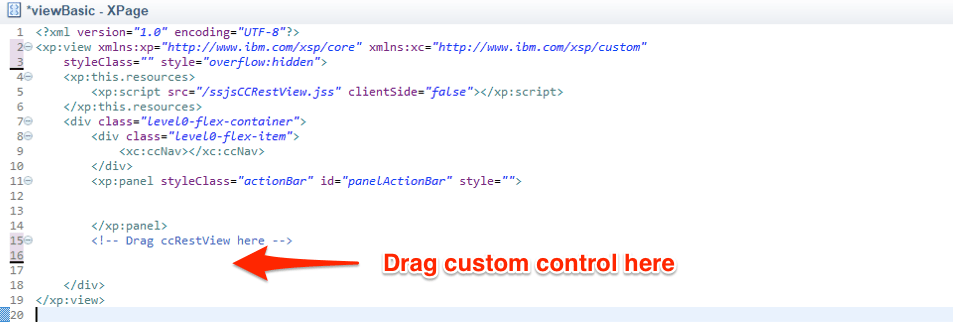
and an XPage template I’m going to use to create all of my demo pages:
<?xml version="1.0" encoding="UTF-8"?>
<xp:view xmlns:xp="http://www.ibm.com/xsp/core"
	xmlns:xc="http://www.ibm.com/xsp/custom" styleClass=""
	style="overflow:hidden">
	<xp:this.resources>
		<xp:script src="/ssjsCCRestView.jss" clientSide="false"></xp:script>
	</xp:this.resources>
	<div class="level0-flex-container">
		<div class="level0-flex-item">
			<xc:ccNav></xc:ccNav>
		</div>
		<xp:panel styleClass="actionBar" id="panelActionBar" style="">


		</xp:panel>
<!-- Drag ccRestView here


 -->

	</div>
</xp:view>
We’re going to get started with the most basic implementation of the Flexible View Control. In my used car database, I have a view xspPhilPaChevTahoe which shows all of the Chevy Tahoes in Philadelphia, PA. Normally I wouldn’t create a single purpose view like this – it’s being done for demonstration purposes only. In a database of 2M records, this view contains 70 and I’m going to display it with the Flexible View Control.

The View Definition
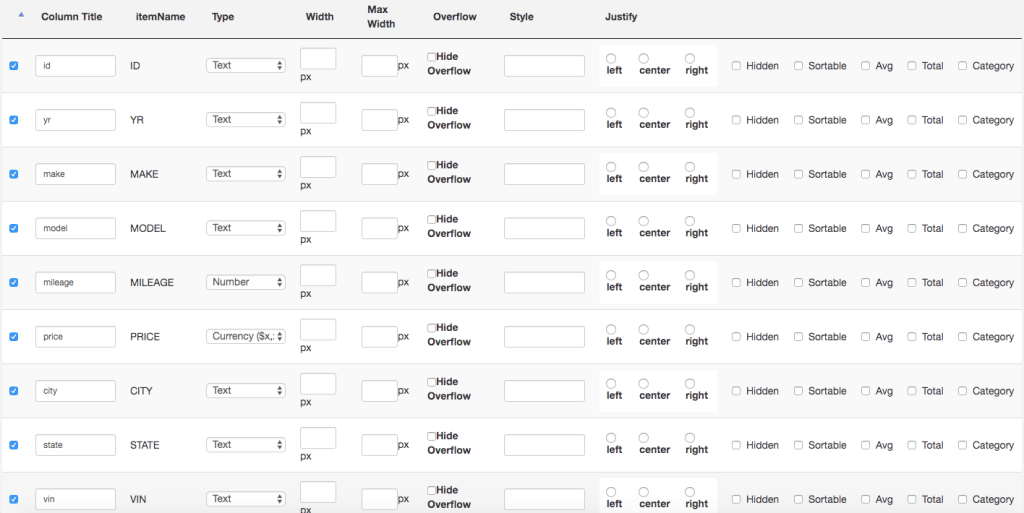
First, I create a View Definition and point it to the xspPhilPaChevTahoe view in the used car database and select all of the columns.
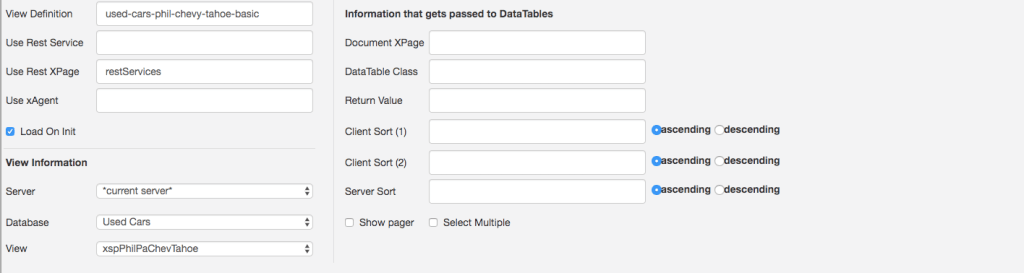
The REST Service
Next, I create the Rest Service that will be used to fetch the data. We told the View Definition to find the REST service on the restServices XPage. This is where I add mine and give it a path-info that matches the key I used in my View Definition above.

After building the application I do a quick test to make sure I’m getting data from the Rest Service:

The XPage
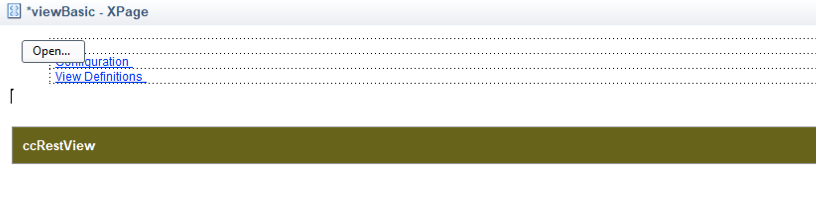
To create my page where I want to put my view, I create a copy of the XPage template and call it viewBasic. I also add a link to the Open button in my navigator custom control that will open this new XPage.
The Flexible View Control
Now, I’m ready to add the control to my new XPage by dragging it from the custom control palette:
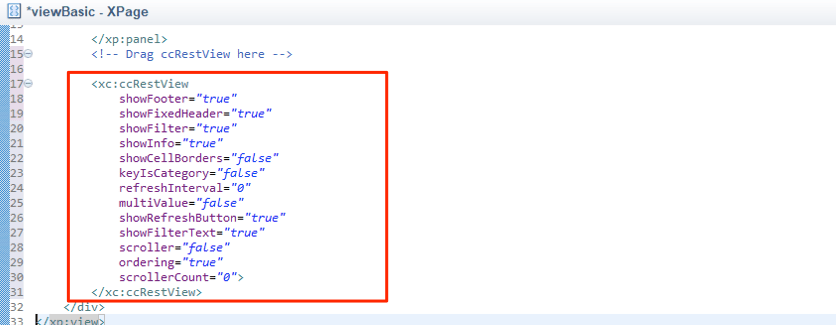
After adding the custom control, take a look at the custom properties by clicking on the control and then clicking the Custom Properties on the Properties tab. There are a lot of properties (some of which have default values) which are integral to making this the “Flexible” View Control for XPages. Some of these properties get passed on to DataTables as the view is constructed.
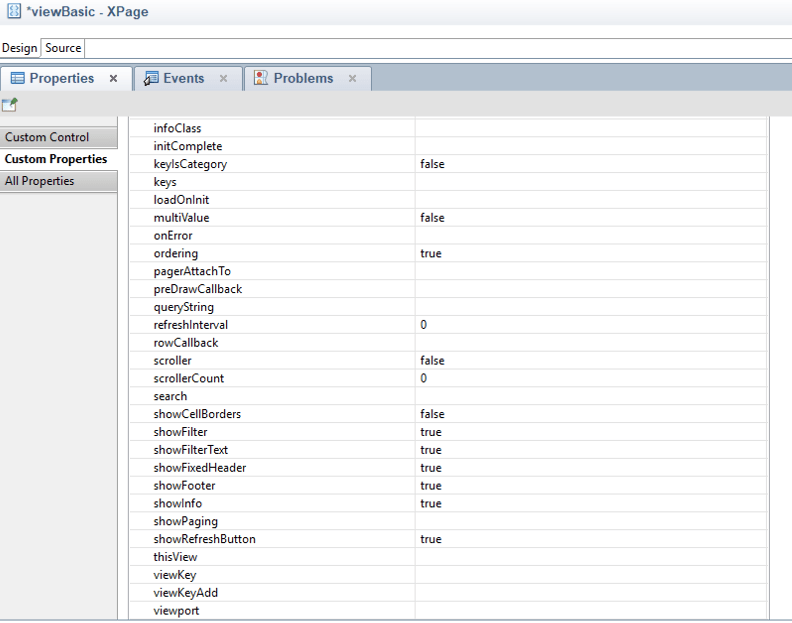
Most importantly, there are three properties that must be set in order for the control to work properly.
| Property | Description |
| thisView | Unique identifier for this view. This value is used in the internals of the custom control to get a handle on this instance of the view control. |
| viewKey | This value refers to the View Definition that the control will use to get its configuration and location of rest data. |
| dataTableClass | A CSS class name that gets applied to the DataTable and is used to refer to the table programmatically. This value should be unique. |
On my viewBasic XPage I use the following values:


The Results
After saving and building I load my viewBasic XPage in the browser and verify I am getting the results I expect:
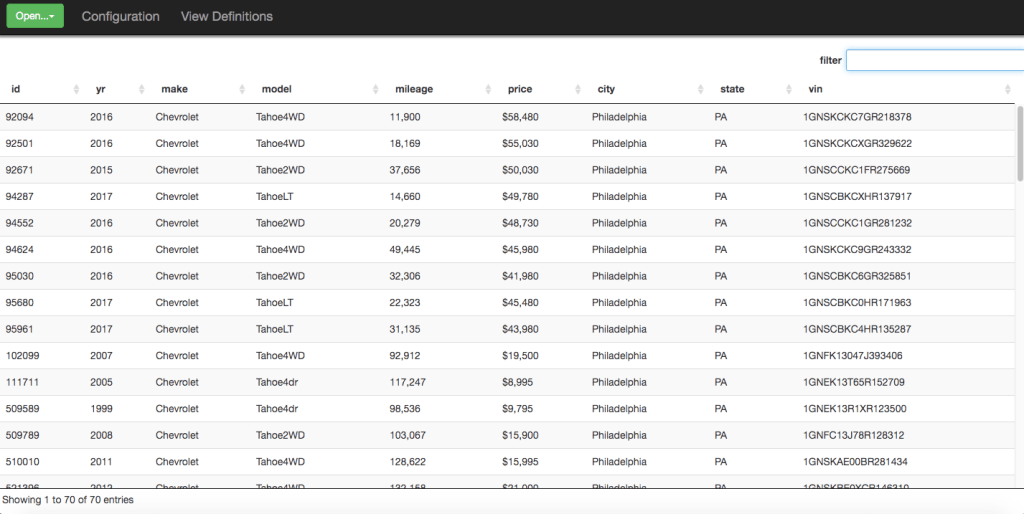
What we have now in our browser is a DataTable (v. 1.10.19) and all of the standard front end tools that come baked into that framework, such as filtering, sorting, etc.
Recap
The purpose of this post was to demonstrate how easy it is to quickly add a view to your application using the Flexible View Control for XPages:
- Create a View Definition.
- Create a REST Service (or reuse an existing service) that points to your Domino view.
- Add the custom control to your XPage and point it to your View Definition
Next
In the next post, I’m going to take this simple example and start adding advanced functionality to create more functional views.
A Flexible View Control for XPages Part 2 – Starting An Application
Posted: December 10, 2019 Filed under: Bootstrap, Custom Control, DataTables, Domino, JavaScript, jQuery, XPages 11 CommentsGet the code
To get started using the Flexible View Control, get your hands on the code. You can do this via two methods:
- By pulling down a fresh database from the github repo.
- By downloading the nsf from here. Make sure you sign the database.
Once you have the database open in Domino Designer either locally, or on your server, build your project.
In Part 1 of the Flexible View Control or XPages series, I gave an overview of the control and architecture of how it works. Now we get to see it in action.
Starting with this blog post, I’m going to demonstrate many features of the FVCX by creating an application starting with the FVCX source database. As the series moves on, I’ll be using a separate database to provide the data – a Used Car database with over 2 million records and only a couple of Notes views. Part of demonstrating the FVCX will be sharing Notes view strategies that simplify surfacing of data not just for views, but for other components like typeaheads.
Out-of-the-box the Flexible View Control has very basic styling to make it easier to integrate with whatever UI design you want to use. For my demos, I’m going to utilize Bootstrap.
The included theme has links to a Bootstrap CDN that are commented out. To add Bootstrap I just unhide the css and js links.


Configuring the Database
Now we are ready to get started! Keep reading below or take a look at the video to the right to see the steps below in action.
Configuration involves two steps:
- Creating the config doc used by View Definitions (adminConfig.xsp)
- Creating the first View Definition which is used to display all View Definitions (adminViewDefinitionDoc.xsp)
The first element we are going to work with is the adminConfig XPage. Open this page in your browser.

The purpose of this XPage is to store some basic configuration information that is used when creating View Definitions.
- Rest Service Path – this is the path (<dir>/<database.nsf>) where you will create rest services to retrieve data. If you leave it blank then the control will look in the current database to find rest services.
- Servers – The list of servers that contain databases with views you need to create View Definitions for. This list populates a dropdown on the adminViewDefinitionDoc XPage. Leave blank if you only need to use the current server.
- Databases – The list of databases with views you need to create View Definitions for. This list populates a dropdown on the adminViewDefinitionDoc XPage. This becomes important if you are separating your data from your design.
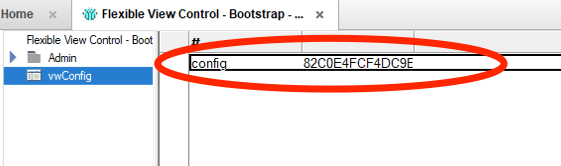
Click the Save button. A Notes document is created. Verify it is there by looking in the vwConfig view. Now, any time the adminConfig XPage is opened the created doc will be automatically loaded.
Creating the first View Definition
The first View Definition we’re going to create will be to display …. the list of View Definitions. Is your head spinning yet? From the adminConfig XPage click the Create View Definition button.

The adminViewDefinitionDoc XPage opens:

There’s quite a bit to unpack here so let’s start with the basics so we can see what the results look like.
| View Definition | This is the “key” for this view def and should be a unique value. It’s also a good idea to make it url friendly as we will see in future posts. I am calling this view-definitions. |
| Use Rest Service | This value should match the “path-info” of a Domino REST Service control. This is only needed if the value above is different than the path-info of your REST service. I’m leaving this blank. |
| Use Rest XPage | This is the XPage where the REST service for this View Defintion is located. The database comes with a restServices XPage so I enter that value here. |
| Load On Init | When checked, this tells the control to load the view as soon as the control is loaded. Since I want my view to load right away, I select it. |
| Server | This is the list of servers we defined on the adminConfig XPage. I select *current server* |
| Database | This is the list of datbases we defined on the adminConfig XPage. I select *current database*. |
| View | Since I’m creating the “View Definitions” View Definition, I choose that view. (I really didn’t want to write View Definition for a 3rd time. Crap, I did it anyway) |
After selecting the View in the dropdown, all of the columns show up below. Now I can start to configure how the view will look. For my example, I’m select all of the columns except the last one.

The FVCX database comes with an XPage adminViewDefinitions that is used to show all View Definitions in the application. This page has the custom control already dragged onto it and configured to point to our view-definitions view def we just created:

When creating the View Definition above, we told it that our REST service was located on the restServices XPage:

Back to the View Definition… When I click the Save button , I’m automatically redirected to this XPage. Here is what it looks like:

We are off and running with the Flexible View Control. In the next post we will start working with some “real” data.
Boot your alerts in the … with bootAlert
Posted: February 10, 2015 Filed under: Bootstrap, XPages | Tags: Bootstrap, Custom Controls, jQuery, XPages 7 CommentsUnfortunately, due to the sudden illness and ultimate passing of a family member in the fall, it has been quite a while since I last blogged. Hopefully, this post finds me getting back on the blogging horse to contribute some content to the Xpages/Domino community and bring some ideas I had been kicking around to fruition.
Today I am releasing bootAlert, a simple XPages custom control that allows developers to add configurable, reusable Bootstrap alerts to their apps without having to add any additional plugins. You should already be using Bootstrap/jQuery in your application in order to use this custom control.
For the past few months, in working on our application migration project, I built a configurable Bootstrap alert custom control. I found myself continuing to add features as different needs arose. So, I thought I would release it to the community.
Why bootAlert?
- bootAlert can be triggered from both server and client-side Javascript
- bootAlert can use Font Awesome icons
- bootAlert can be turned into a Growl-like message on-the-fly
- bootAlert is dynamically configurable – one action may require the
'success'class and another may require a'warning'or'danger'notification. One control can be used to display all three. - bootAlert can be customized with css
- Add as many bootAlert controls to your page as you want

bootAlert can be triggered from server-side js with view.postScript()
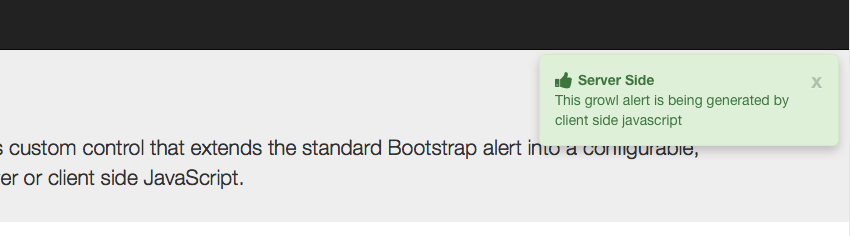
bootAlert let’s you add Bootstrap Growl messages to your application
Demo
I plan on submitting this as an OpenNtf project, but for now you can find a demo, as well as download bootAlert here
A github repo can be found here.
Getting Started
Getting started with bootAlert is easy. Simply:
- Download the demo database
- Copy the custom control and script library into your application (or copy the contents of the script library into your existsing client-side script library)
- Drag the custom control onto your xpage and populate the
alertNameproperty
<xc:ccBootAlert alertName="alertDemo2" id="ccBootAlertDemo2"></xc:ccBootAlert>
- Call bootAlert from client-side js …
// Client side js
var o = {}
o.title = "Client Side";
o.body = "This alert is being generated by client side javascript";
o.alertType = "danger";
o.alertIcon = "fa-calendar fa-lg"
bootAlert.show('alertDemo2',JSON.stringify(o))
- or call bootAlert from server-side js by putting a value into a requestScope variable and making sure the bootAlert control is part of the partial refresh target:
// Server side js
// This method assumes the alert is part of a partial refresh target
var o = {};
o.title = "Server Side";
o.body = "This alert is being generated from ssjs";
o.alertType = "info";
// The requestScope var name should match the alertName given to the bootAlert control
requestScope.put("alertDemo2",o);
- Finally, you can use view.postScript() to trigger a bootAlert:
// Server side js
// The alert custom control does NOT need to be part of a partial refresh target
// The parameters being passed to bootAlert need to be serialized
var o = {}
o.title = "Server Side > Client Side";
o.body = "This alert is being triggered by client side js called from server side js";
o.alertType = "warning";
o.autoClose = false;
view.postScript("bootAlert.show('alertDemo2'," + toJson(o) + ")");
I hope others find this control as useful as I have in my projects!
