A Flexible View Control for XPages Part 7 – Modals & Picklists
Posted: April 6, 2020 Filed under: Bootstrap, DataTables, Domino, JavaScript, jQuery, XPages | Tags: Bootstrap, DataTables, Domino, jQuery, Lotus Notes, Modals, XPages 3 CommentsWhile I intended to get to this blog post eventually, the urgency of doing so was increased due to the following post on StackOverflow:
https://stackoverflow.com/questions/61061571/xpages-flexible-view-control
The OP also reached out to me directly looking for an answer so why not crank out a blog post with the answer?
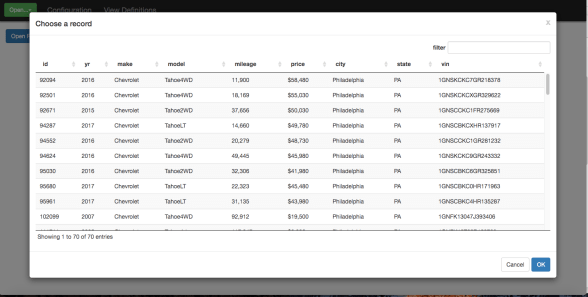
By combining the Flexible View Control with a Bootstrap modal, you can easily mimic the Lotus Notes Picklist functionality. Getting the control working in a Bootstrap modal requires only a few simple steps, illustrated in this working demo.
Step 1 – Add the modal source to your page
I start with something like this:
<!-- Modal -->

		<div class="modal fade picklist" id="myModal" tabindex="-1" role="dialog"
		aria-labelledby="myModalLabel">
		<div class="modal-dialog" role="document">
			<div class="modal-content">
				<div class="modal-header">
					<button type="button" class="close" data-dismiss="modal"
						aria-label="Close">
						<span aria-hidden="true">x</span>
					</button>
					<h4 class="modal-title" id="myModalLabel">Choose a record</h4>
				</div>
				<div class="modal-body" style="display:flex;">
					<!-- place the Flexible View Control here -->
				</div>
				<div class="modal-footer">
					<button type="button" class="btn btn-default" data-dismiss="modal">
						Cancel</button>
					<button type="button" class="btn btn-primary">OK</button>
				</div>
			</div>
		</div>
	</div>
For the most part, the code above is straight off the Bootstrap site with a few important additions:
- I added the class ‘picklist’ to the ‘modal’ div.
- I add an inline style to ‘modal-body’ of ‘display:flex;’. This is very important since the control uses Flexbox (more on that in a future post).
Step 2 – Add the control to your page
Drop the control in the space bookmarked in the source above and configure the control as you do for a normal view page. Make sure you keep the modal-body intact!
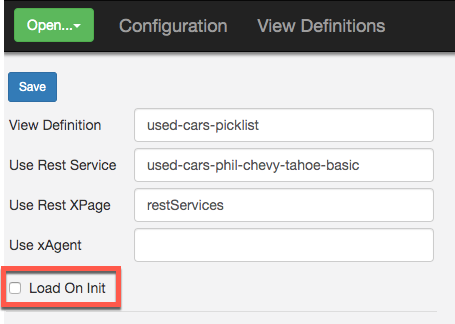
Step 3 – Check your View Definition
It is highly recommended to have the Load on Init property unchecked. You will see why in a moment.
Step 4 – Resize the modal
By default, the Bootstrap modal is pretty small. Of course, the dimensions can be changed with css, but how do you deal with different screen sizes? By adding an event handler to the ‘show’ event of the Bootstrap modal, you can resize the modal to a percentage of available screen space:
<xp:scriptBlock>
<xp:this.value><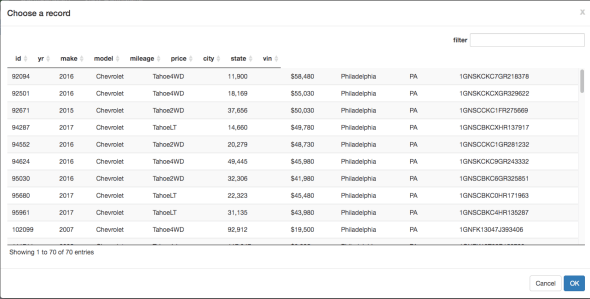
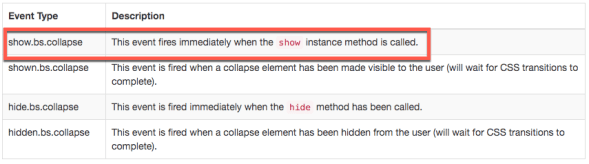
In this example above, the view is built during the ‘show’ event, resulting in the table header dimensions not matching up to the actual data rows.
Lucky for us, Bootstrap has another event that we can tap into. You may have noticed it in the screenshot above. The ‘shown’ event fires AFTER the modal has been rendered to the user:

By adding 3 lines of code to the scriptBlock above and tapping into the ‘shown’ event, our table will be built with the proper layout dimensions.
$(".picklist").on('shown.bs.modal', function () {
	viewBasic.build();
});
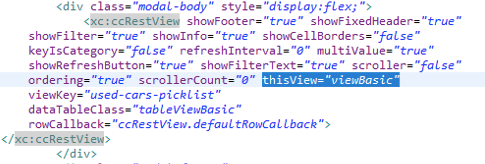
In the snippet above, viewBasic refers to the ‘thisView’ property of the control. Since the ‘Load on Init’ property is unchecked on the View Definition, the view needs to be triggered by its ‘build’ function.
Step 6 – Patch the csjsCCRestView.js file
After completing the steps above, the modal will work fine and the table will load and be fully functional. However, in creating this demo I realized there is an adjustment that needs to be made to the source code. This is due to legacy code that was used when many aspects of the control were being sized dynamically with javascript prior to implementing Flexbox.
The issue is the footer is being calculated based on the window’s dimensions and not the modal’s, resulting in the width of the interior of the modal being wider than the modal container. This will be updated on the github repo, but in the short term you can fix it in your database by updating the buildFooter function in the ccRestView.js file with the code below. The fixes are labeled ‘//MODAL FIX’. A few lines are commented out and a few are altered.
buildFooter : function(o) {

		if (o==null) { return; }
		if (o==undefined) { return; }
		console.log("=== start build footer for " + o.thisView + " ===")
		if ($(".ffDefault",$(".panel"+o.thisView)).length > 0) {
			// check to see if the info is in the footer.
			// if so, set it aside and pick it up later
			//$(".ffDefault",$(".panel"+o.thisView)).remove();
		// MODAL FIX	$(".ffDefault",$(".panel"+o.thisView)).css("max-width",$(".dataTables_scrollBody table",$(".panel"+o.thisView)).outerWidth()+"px")
		// MODAL FIX	$(".ffDefault",$(".panel"+o.thisView)).css("min-width",$(".dataTables_scrollBody table",$(".panel"+o.thisView)).outerWidth()+"px")
			 return;
		}
		var cellCount = $("th",$(".panel"+o.thisView + " " + o.dataTableClass + " thead")[0]);
		footerAttachTo = o.viewport == "" ? "body" : o.viewport;
		var tableWidth = "100%"; //$(".panel"+o.thisView + " tbody").outerWidth();
		var tdCells = [];
		var rowOne = $(".panel"+o.thisView + " tbody tr");
		//console.log("rowOne length=" + $(rowOne).html())
		// create footer cells to match header
		for (x=0;x<cellCount.length;x++) {

			cell = $("td",rowOne).length == 1 ? $("td",rowOne) : $("td",rowOne)[x]

			var paddingLR = ($(cell).outerWidth() - $(cell).width())/2 + "px";  // css("width") //$("td",rowOne).css("padding");   // ($(o.cellCount[x]).outerWidth() - $(o.cellCount[x]).width())/2 + "px";
			var border = ($(cell).outerWidth())
			tdCells.push("<td data-column='" + o.itemIndexes[x] + "' class='" + o.itemNames[x] + "Foot' style='width:" + $(cell).width() + "px;padding:" + paddingLR + "'> </td>");  //padding-left:" + paddingLR + ";padding-right:" + paddingLR + "
		}


		var pos = $(footerAttachTo).position();
		// get the width of the fixed header so we can apply it to
		// the footer
		width = $(footerAttachTo).css("width");
		footerAtachTo = footerAttachTo != "" ? footerAttachTo : "body";
		//console.log("attaching footer to " + footerAttachTo);
		var footerHtml = "<div class='ffDefault " + o.ffClass + "' style='width:" + width + "'><table style='width:" + tableWidth + "px' class='fixedFooterTable cell-border'><tfoot><tr>" + tdCells.join("") + "</tr></tfoot></table></div>";
		if (o.showFixedHeader) {
			width="auto"; // MODAL FIX
			var newFooter = $(".dataTables_scroll",$(".panel"+o.thisView)).after("<div class='ffDefault " + o.ffClass + "' style='width:" + width + "'><table style='width:" + tableWidth + "' class='fixedFooterTable cell-border'><tfoot><tr>" + tdCells.join("") + "</tr></tfoot></table></div>");
			$(".ffDefault",$(".panel"+o.thisView)).prepend($(".dataTables_info",$(".panel"+o.thisView)))
			$(".dataTables_info",$(".panel"+o.thisView)).css({"position":"absolute","padding":"5px","float":"none"})
		} else {
			width="auto"; // MODAL FIX
			var newFooter = $(".panelRestView",$(".panel"+o.thisView)).append("<div class='ffDefault " + o.ffClass + "' style='width:" + width + "'><table style='width:" + tableWidth + "px' class='fixedFooterTable cell-border'><tfoot><tr>" + tdCells.join("") + "</tr></tfoot></table></div>");
		}

		if (footerAttachTo != "body") {
		  if (pos) {
			left = $(footerAttachTo).css("position") == "relative" ? 0 : pos.left;
		  }
		}
	// MODAL FIX	$(".ffDefault",$(".panel"+o.thisView)).css("max-width",$(".dataTables_scrollBody table",$(".panel"+o.thisView)).outerWidth()+"px");
	// MODAL FIX	$(".ffDefault",$(".panel"+o.thisView)).css("min-width",$(".dataTables_scrollBody table",$(".panel"+o.thisView)).outerWidth()+"px");
		console.log("=== end build footer for " + o.thisView + " ===")
	},
In conclusion
Integrating the Flexible View Control with a Bootstrap modal is easy and provides all of the functionality of DataTables you’d expect – filtering, sorting, etc.
Postscript
For applications where multiple Picklists are needed with different data, you can create a modal custom control with custom properties that can be fed into the view control dynamically. I have one application that has at least 20-25 different Picklists and this method works great.
Modernizing A Notes App With XPages (MANA-X) Part 1 – Introduction
Posted: September 3, 2014 Filed under: Uncategorized | Tags: Lotus Notes, Modernization, XPages 2 CommentsA few weeks ago, I started a new position. For this position, I was hired specifically to lead the transition of a key Lotus Notes client application into the XPages world, where modern capabilities and UI can be merged together to create a great user experience and better support the business processes going forward.
Actually, this application is more than just a “key” application. It is THE application. Well, technically, it is several applications, or modules, all tied together under one umbrella, which have supported just about every aspect of a business that has tripled in size in the last 10-15 years.
While there is an urge to jump right in and start coding, there are many things to consider ahead of time:
- Technical – Which framework(s) to use? Getting the development team up to speed on source control for better code management. Developing for IE9/IE11.
- Cultural – How to introduce users to a modern web application when they are used to working in the Lotus Notes client?
- Infrastructure – Keeping users productive with high availability. Making sure remote users do not have performance issues.
This is in no way intended to be a comprehensive list; These are just a few of the issues we’ve started to discuss as a team in the early stages of project planning.
Over the course of the coming months (years?), I’m hoping to share our experiences of moving this massive application to XPages and all of the successes and challenges that come with that (as much as I can, anyway).
Disclaimer: Any opinions and views expressed are my own and not necessarily those of my company. This series is intended as one company’s experience of moving an application to XPages and not a definitive guide on how to migrate an application to XPages.
