A Flexible View Control for XPages Part 5 – Processing Selected Rows
Posted: January 13, 2020 Filed under: Bootstrap, Custom Control, DataTables, Domino, JavaScript, jQuery, XPages | Tags: Bootstrap, DataTables, Domino View, jQuery, XPages Leave a commentThe previous post in this series demonstrated how to add click events to a view created with the Flexible View Control utilizing the callbacks that are built into DataTables. But once a row (or rows) is selected, how do you actually DO something with the selection?
Getting a Handle On Selected Rows
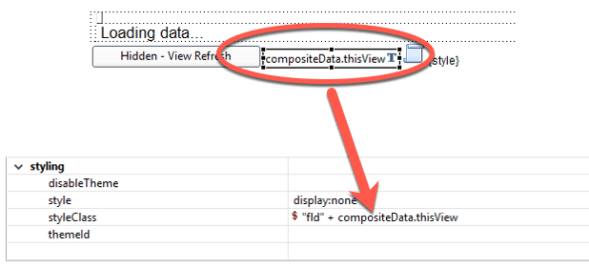
There is a hidden field on the control that stores the @unid of the selected rows along with any other data the View Definition configured to return when selected (in JSON format). When the control is rendered, a class is applied to the field based on the “thisView” parameter given to the control.
Client-Side Data
In the demo we built in Part 4, we gave our thisView parameter the value “viewBasic”. This allows us to reference the selected row(s) client-side in jQuery with the syntax:
$('.fldviewBasic').val();
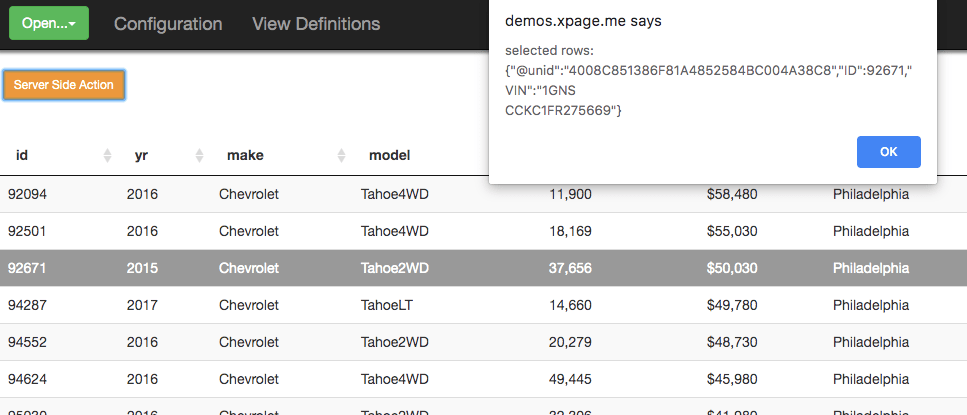
Using the demo from http://demos.xpage.me/demos/datatables-xpages-bootstrap.nsf/viewBasicCallbacks.xsp, when I select a row and examine the hidden field in dev tools I see:

What if I select multiple rows?

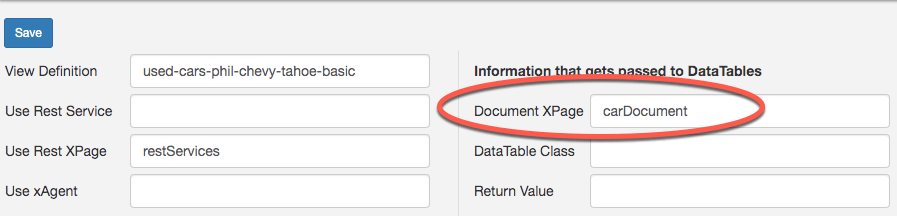
What if I want to return data besides just the row’s document id? To do so, I update the View Definition to tell it to return the columns I want when I click a row:
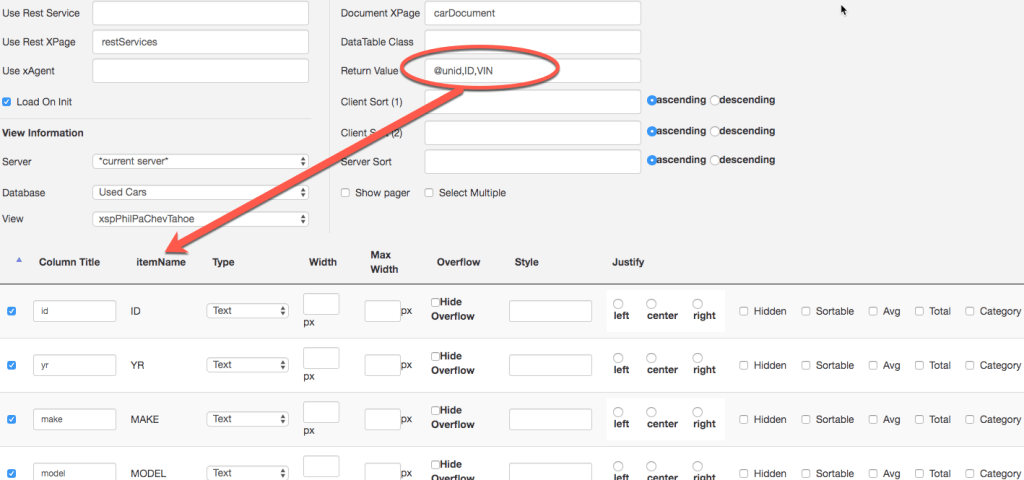
In this example, I want to return the ID and VIN columns in addition to @unid.

Important Note: By default, the @unid value is returned when a row is clicked. The Return Value of the View Definition overrides this value. Therefore, if values are entered in this field on the View Definition, @unid needs to be included if that value needs to be accessed.
Server-Side Data
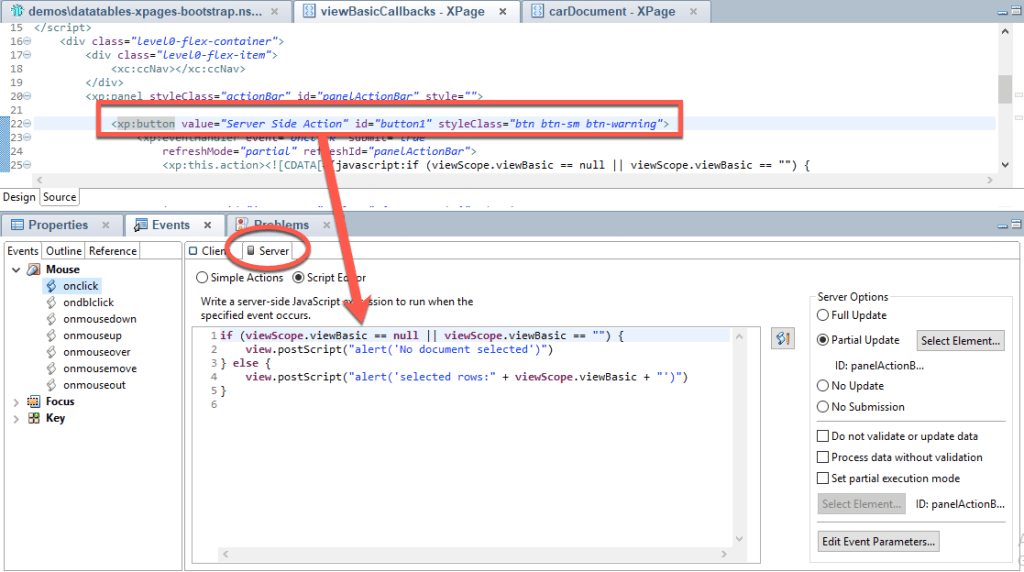
The Flexible View Control also makes it easy to pass the selected rows server-side. The aforementioned hidden field is bound to a viewScope mapped to the thisView value.

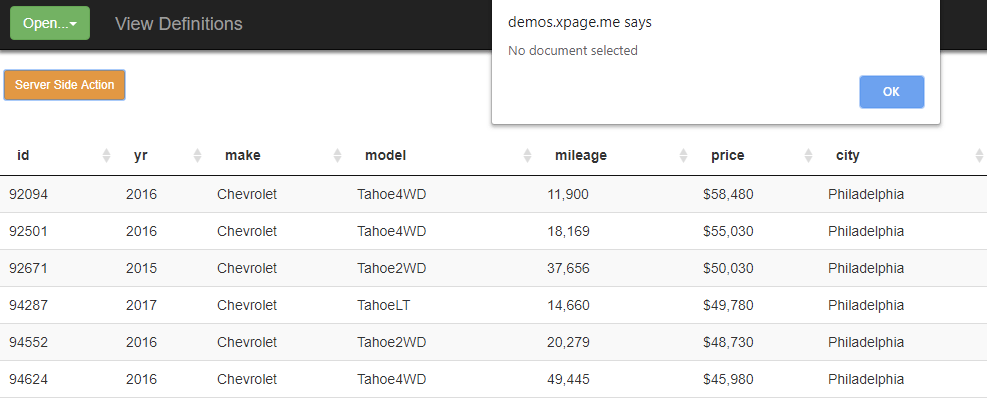
To demonstrate, I’m adding a button to my example above that does a partial refresh on a panel and executes some server-side code to examine the selected rows:
Recap
The Flexible View Control for XPages makes it very easy to get a handle on the rows selected in a view and process that data both client-side and server-side
In the next post …
I’ll start to demonstrate the “flexible” part of the Flexible View Control by showing how a Domino view with over 2 million records can be mined to create different representations of data with the control through the power of the View Definitions.
A Flexible View Control for XPages Part 4 – Callbacks & Click Events
Posted: January 6, 2020 Filed under: Bootstrap, Custom Control, DataTables, Domino, JavaScript, jQuery, XPages | Tags: Bootstrap, Domino, jQuery, XPages 1 CommentRegardless of the type of application you’re working with, when interacting with view data you typically want to be able to take some type of action on that data, such as open a document or manipulate the data in some way.
Callbacks
DataTables, being very callback “heavy”, has two callbacks that can be utilized to add row-level functionality to take action on a clicked/double-clicked row and its data:
| Callback | From the DataTables documentation |
|---|---|
| rowCallback | This callback allows you to ‘post process’ each row after it have been generated for each table draw, but before it is rendered into the document. |
| createdRow | This callback is executed when a TR element is created (and all TD child elements have been inserted), or registered if using a DOM source, allowing manipulation of the TR element. |
The Flexible View Control has properties that make incorporating these callbacks into your table build quite easy.
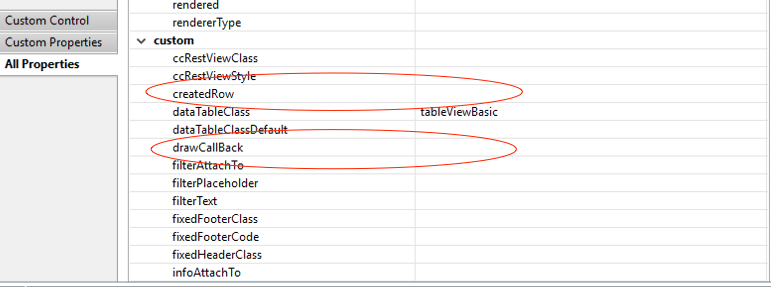
The View Control has a scriptBlock that builds a JavaScript object at runtime which contains the DataTable initialization code. This initialization code contains placeholders for rowCallback and createdRow (as well as other callbacks) that are evaluated by Expression Language to create function calls at runtime. The necessary function parameters are passed in automatically.

You’ll notice in the createdRow callback above that by default the documentId of each row is added as a class parameter. As you will see, this makes it easy to identify rows that have been clicked/double-clicked when needing to take action.
The Flexible View Control source code has a default rowCallback function that can be utilized to add some basic click/double-click actions. Building on the demo created in the previous post, I’m going to add this rowCallback to that control.

Note: It’s important to use the correct syntax when supplying a function to a callback property in the view control. Since Expression Language is being used to dynamically create the function call, the “()” are not needed.
| Correct | ccRestView.defaultRowCallback |
| Incorrect | ccRestView.defaultRowCallback() |
The defaultRowCallback code is below:
defaultRowCallback : function(row,data,index,params,o) {
		var attr = $(row).attr("data-docid");

		// For some browsers, `attr` is undefined; for others, `attr` is false. Check for both.
		if (typeof attr !== typeof undefined && attr !== false) {
		  // Element has this attribute
			return;
		}

		// add some row attr
		$(row).attr("data-docid",data['@unid']);
		$(row).attr("data-xpage",data[o.xpage]);

                // These are defined by the return values field on the view definition
		for (var x=0;x<params.length;x++) {
			params[x] != "@unid" ? $(row).attr("data-value-"+params[x],data[params[x]]) : "";
		}

		var retData = ccRestView.getReturnData(o,data);

		$(row).attr("data-return",JSON.stringify(retData));
		$(row).click(function(ev) {

			// 	Get the row data
			var retData = $(row).attr("data-return");

			if ($("td",$(this)).hasClass("rowSelectOn")) {

				if (o.multiValue=="true") {

					if (ev.ctrlKey && ev.shiftKey) {
						// do nothing

					} else if (ev.ctrlKey) {
						// Remove the selected class from the selected row
						ccRestView.removeSelectedRow(o,retData,this);

					} else if (ev.shiftKey) {

						if (index > window[o.thisView].config.firstIndex) {

							$("."+o.dataTableClass + " tbody tr").each(function(rowIndex) {

								if (rowIndex >= window[o.thisView].config.firstIndex && rowIndex <= index) {
									retData = $(this).attr("data-return");
									ccRestView.insertSelectedRow(o,retData,this)
								}
							})
						} else {
							console.log("select rows " + index + " to " + window[o.thisView].config.firstIndex);
						}
					} else {
						// no keys pressed.  select this row only

						ccRestView.clearSelectedRows(o,this);
						ccRestView.insertSelectedRow(o,retData,this);
						window[o.thisView].config.firstIndex = index;
					}
				} else {
					// Remove the selected class from the selected row
					ccRestView.removeSelectedRow(o,retData,this);
				}

			} else {

				if (o.multiValue!="true") {
					// Remove the selected class from all rows first
					ccRestView.clearSelectedRows(o,this);
					ccRestView.insertSelectedRow(o,retData,this);
				} else {
					// multi
					if (ev.shifKey && ev.ctrlKey) {

					} else if (ev.ctrlKey) {
						ccRestView.insertSelectedRow(o,retData,this);
						window[o.thisView].config.firstIndex = index;
					} else if (ev.shiftKey) {
						ccRestView.clearSelectedRows(o, this);

						if (index > window[o.thisView].config.firstIndex) {

							$(o.dataTableClass + " tbody tr").each(function(rowIndex) {

								if ($(this).attr("data-index") >= window[o.thisView].config.firstIndex && $(this).attr("data-index") <= index) {
									retData = $(this).attr("data-return");
									ccRestView.insertSelectedRow(o,retData,this)
								}
							})
						} else {
							console.log("select rows " + index + " to " + window[o.thisView].config.firstIndex);
						}
					} else {
						ccRestView.clearSelectedRows(o,this);
						ccRestView.insertSelectedRow(o,retData,this, function() {

						});
						window[o.thisView].config.firstIndex = index;
					}

				}

			}

		}); // end click

		$(row).dblclick(function() {

			// get the unid of the double clicked row
			var docid = $(this).attr("data-docid");
			href = location.href.split(".nsf");
			location.href=href[0]+".nsf/"+o.xpage+".xsp?documentId="+docid+"&action=editDocument";
		});
Click Events
So what exactly is the rowCallback doing?
First, some attributes are added to the row dom to make it easier to reference this row by the @unid when it’s clicked or double-clicked:
var attr = $(row).attr("data-docid");

		// For some browsers, `attr` is undefined; for others, `attr` is false. Check for both.
		if (typeof attr !== typeof undefined && attr !== false) {
		  // Element has this attribute
			return;
		}

		// add some row attr
		$(row).attr("data-docid",data['@unid']);
The data-xpage attribute is added to store the XPage that should be opened when this row is double-clicked. This value typically comes from the View Definition:
$(row).attr("data-xpage",data[o.xpage]);
Next, more parameters are added. This portion of the code is useful when data besides @unid needs to be extracted from a row and passed on to another process.
// These are defined by the return values field on the view definition
		for (var x=0;x<params.length;x++) {
			params[x] != "@unid" ? $(row).attr("data-value-"+params[x],data[params[x]]) : "";
		}

		var retData = ccRestView.getReturnData(o,data);

		$(row).attr("data-return",JSON.stringify(retData));
Now, we add the click event to every row. When a row is clicked the following evaluations are made:
- Does this view allow multiple selections?
- If so, check for other key presses (ctrl, shift). The control handles multiple selections like windows explorer.
- Is this row already selected?
- If not, add a class that changes the row color and add the row @unid to a hidden field (more on this in the next post).
- If so, remove the class that changes the row color and remove the @unid from the hidden field.
        $(row).click(function(ev) {

            //  Get the row data
            var retData = $(row).attr("data-return");

            if ($("td",$(this)).hasClass("rowSelectOn")) {

                if (o.multiValue=="true") {

                    if (ev.ctrlKey && ev.shiftKey) {
                        // do nothing

                    } else if (ev.ctrlKey) {
                        // Remove the selected class from the selected row
                        ccRestView.removeSelectedRow(o,retData,this);

                    } else if (ev.shiftKey) {

                        if (index > window[o.thisView].config.firstIndex) {

                            $("."+o.dataTableClass + " tbody tr").each(function(rowIndex) {

                                if (rowIndex >= window[o.thisView].config.firstIndex && rowIndex <= index) {
                                    retData = $(this).attr("data-return");
                                    ccRestView.insertSelectedRow(o,retData,this)
                                }
                            })
                        } else {
                            console.log("select rows " + index + " to " + window[o.thisView].config.firstIndex);
                        }
                    } else {
                        // no keys pressed.  select this row only

                        ccRestView.clearSelectedRows(o,this);
                        ccRestView.insertSelectedRow(o,retData,this);
                        window[o.thisView].config.firstIndex = index;
                    }
                } else {
                    // Remove the selected class from the selected row
                    ccRestView.removeSelectedRow(o,retData,this);
                }

            } else {

                if (o.multiValue!="true") {
                    // Remove the selected class from all rows first
                    ccRestView.clearSelectedRows(o,this);
                    ccRestView.insertSelectedRow(o,retData,this);
                } else {
                    // multi
                    if (ev.shifKey && ev.ctrlKey) {

                    } else if (ev.ctrlKey) {
                        ccRestView.insertSelectedRow(o,retData,this);
                        window[o.thisView].config.firstIndex = index;
                    } else if (ev.shiftKey) {
                        ccRestView.clearSelectedRows(o, this);

                        if (index > window[o.thisView].config.firstIndex) {

                            $(o.dataTableClass + " tbody tr").each(function(rowIndex) {

                                if ($(this).attr("data-index") >= window[o.thisView].config.firstIndex && $(this).attr("data-index") <= index) {
                                    retData = $(this).attr("data-return");
                                    ccRestView.insertSelectedRow(o,retData,this)
                                }
                            })
                        } else {
                            console.log("select rows " + index + " to " + window[o.thisView].config.firstIndex);
                        }
                    } else {
                        ccRestView.clearSelectedRows(o,this);
                        ccRestView.insertSelectedRow(o,retData,this, function() {

                        });
                        window[o.thisView].config.firstIndex = index;
                    }

                }

            }

        }); // end click
The double-click event is much simpler. It simply opens the selected document using the XPage defined on the View Definition:
$(row).dblclick(function() {

			// get the unid of the double clicked row
			var docid = $(this).attr("data-docid");
			href = location.href.split(".nsf");
			location.href=href[0]+".nsf/"+o.xpage+".xsp?documentId="+docid+"&action=editDocument";
		});
Selecting Multiple Rows
Set the multiValue property of the view control to true:
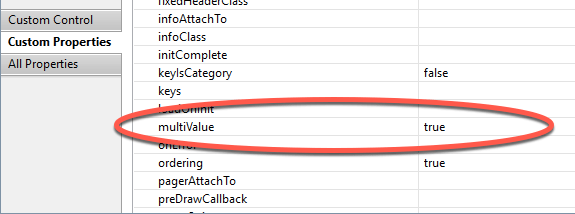
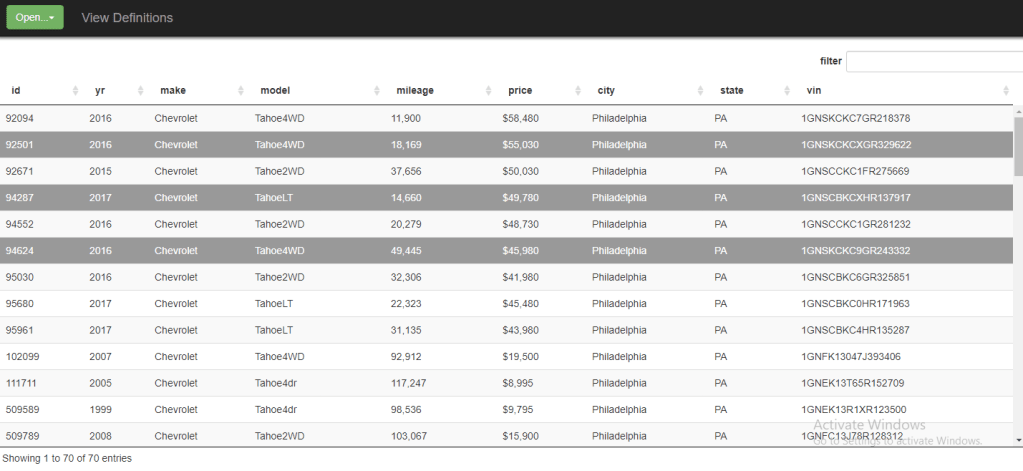
Now, I can select multiple documents by holding <ctrl> or <shift> when clicking:
Building a Demo
In order to demonstrate everything described above, I’m going to make a copy of my viewBasic XPage that was created in Part 3, call it viewBasicCallbacks and add the rowCallback:

I’m leaving everything else intact – using the same settings and the same View Definition.
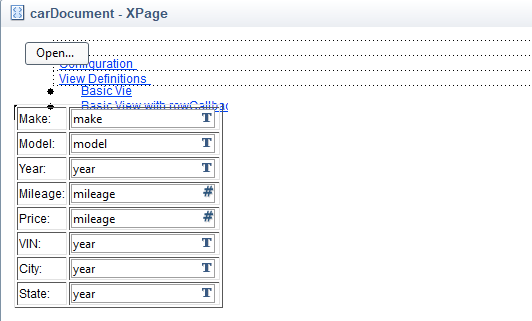
To demo the double-click, I create a basic XPage to display a used car record and I need to update my View Definition so that when I double click a row in the view it opens this carDocument XPage:

Here’s the link: http://demos.xpage.me/demos/datatables-xpages-bootstrap.nsf/viewBasicCallbacks.xsp
In the next post …
We will see how the selected rows can be accessed both client and server side.
A Flexible View Control for XPages Part 3 – Create a Basic View
Posted: December 19, 2019 Filed under: Bootstrap, Custom Control, DataTables, Domino, XPages | Tags: Bootstrap, DataTables, Domino, XPages 3 CommentsSee the demo live
You can see the demo created in this post here. As more demos are added to demonstrate the many features of the Flexible View Control, they too will be available online.
In Parts 1 & 2 we learned about the Fexible View Control and created the configuration we needed to get started with our application.
The Data
Now, we are going to create a view from scratch utilizing a database of 2 million records comprised of used car data.
To get started I need to add the used car database to my configuration document so the View Definition XPage can read the views in this database.

As mentioned in a previous post, and as you can see above, I’m using Bootstrap (3.4) in my application for my UI framework. I’ve already created a navigator custom control:
![]()
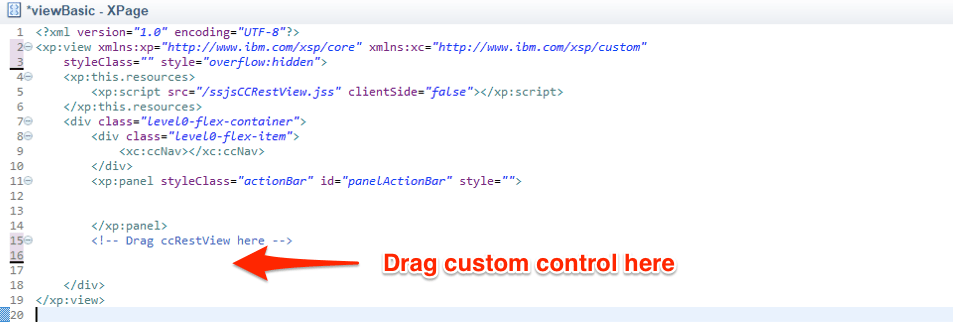
and an XPage template I’m going to use to create all of my demo pages:
<?xml version="1.0" encoding="UTF-8"?>
<xp:view xmlns:xp="http://www.ibm.com/xsp/core"
	xmlns:xc="http://www.ibm.com/xsp/custom" styleClass=""
	style="overflow:hidden">
	<xp:this.resources>
		<xp:script src="/ssjsCCRestView.jss" clientSide="false"></xp:script>
	</xp:this.resources>
	<div class="level0-flex-container">
		<div class="level0-flex-item">
			<xc:ccNav></xc:ccNav>
		</div>
		<xp:panel styleClass="actionBar" id="panelActionBar" style="">


		</xp:panel>
<!-- Drag ccRestView here


 -->

	</div>
</xp:view>
We’re going to get started with the most basic implementation of the Flexible View Control. In my used car database, I have a view xspPhilPaChevTahoe which shows all of the Chevy Tahoes in Philadelphia, PA. Normally I wouldn’t create a single purpose view like this – it’s being done for demonstration purposes only. In a database of 2M records, this view contains 70 and I’m going to display it with the Flexible View Control.

The View Definition
First, I create a View Definition and point it to the xspPhilPaChevTahoe view in the used car database and select all of the columns.
The REST Service
Next, I create the Rest Service that will be used to fetch the data. We told the View Definition to find the REST service on the restServices XPage. This is where I add mine and give it a path-info that matches the key I used in my View Definition above.

After building the application I do a quick test to make sure I’m getting data from the Rest Service:

The XPage
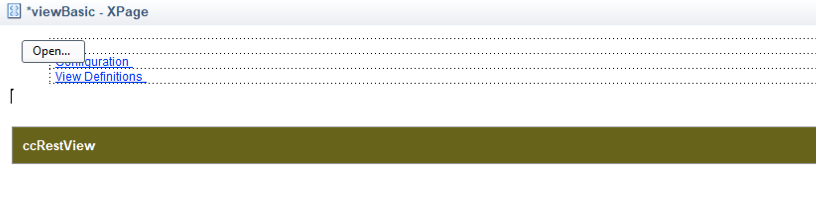
To create my page where I want to put my view, I create a copy of the XPage template and call it viewBasic. I also add a link to the Open button in my navigator custom control that will open this new XPage.
The Flexible View Control
Now, I’m ready to add the control to my new XPage by dragging it from the custom control palette:
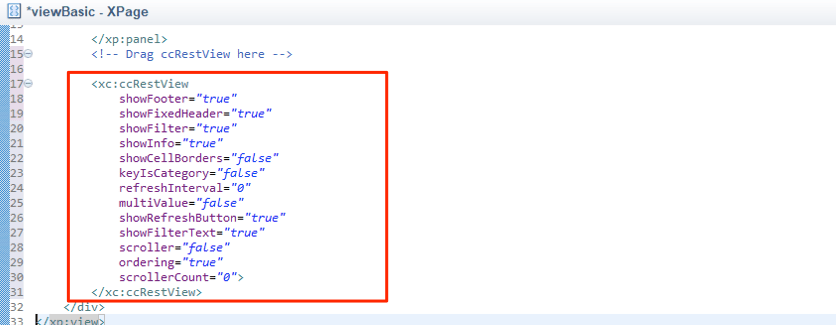
After adding the custom control, take a look at the custom properties by clicking on the control and then clicking the Custom Properties on the Properties tab. There are a lot of properties (some of which have default values) which are integral to making this the “Flexible” View Control for XPages. Some of these properties get passed on to DataTables as the view is constructed.
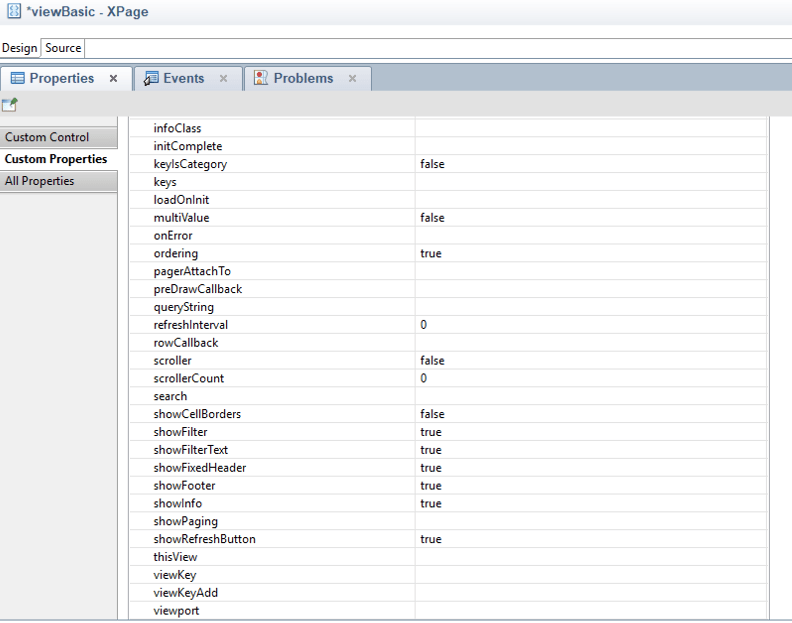
Most importantly, there are three properties that must be set in order for the control to work properly.
| Property | Description |
| thisView | Unique identifier for this view. This value is used in the internals of the custom control to get a handle on this instance of the view control. |
| viewKey | This value refers to the View Definition that the control will use to get its configuration and location of rest data. |
| dataTableClass | A CSS class name that gets applied to the DataTable and is used to refer to the table programmatically. This value should be unique. |
On my viewBasic XPage I use the following values:


The Results
After saving and building I load my viewBasic XPage in the browser and verify I am getting the results I expect:
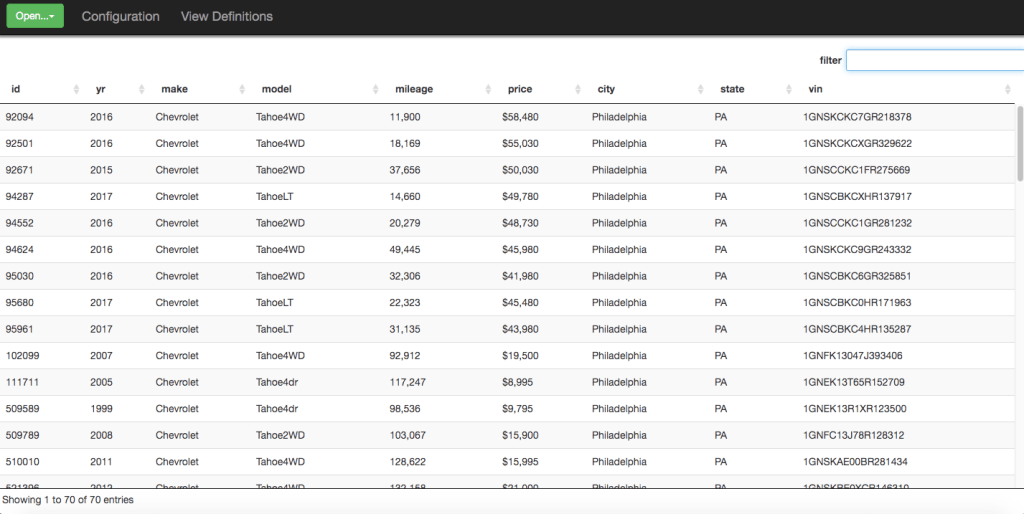
What we have now in our browser is a DataTable (v. 1.10.19) and all of the standard front end tools that come baked into that framework, such as filtering, sorting, etc.
Recap
The purpose of this post was to demonstrate how easy it is to quickly add a view to your application using the Flexible View Control for XPages:
- Create a View Definition.
- Create a REST Service (or reuse an existing service) that points to your Domino view.
- Add the custom control to your XPage and point it to your View Definition
Next
In the next post, I’m going to take this simple example and start adding advanced functionality to create more functional views.
A Flexible View Control for XPages Part 2 – Starting An Application
Posted: December 10, 2019 Filed under: Bootstrap, Custom Control, DataTables, Domino, JavaScript, jQuery, XPages 11 CommentsGet the code
To get started using the Flexible View Control, get your hands on the code. You can do this via two methods:
- By pulling down a fresh database from the github repo.
- By downloading the nsf from here. Make sure you sign the database.
Once you have the database open in Domino Designer either locally, or on your server, build your project.
In Part 1 of the Flexible View Control or XPages series, I gave an overview of the control and architecture of how it works. Now we get to see it in action.
Starting with this blog post, I’m going to demonstrate many features of the FVCX by creating an application starting with the FVCX source database. As the series moves on, I’ll be using a separate database to provide the data – a Used Car database with over 2 million records and only a couple of Notes views. Part of demonstrating the FVCX will be sharing Notes view strategies that simplify surfacing of data not just for views, but for other components like typeaheads.
Out-of-the-box the Flexible View Control has very basic styling to make it easier to integrate with whatever UI design you want to use. For my demos, I’m going to utilize Bootstrap.
The included theme has links to a Bootstrap CDN that are commented out. To add Bootstrap I just unhide the css and js links.


Configuring the Database
Now we are ready to get started! Keep reading below or take a look at the video to the right to see the steps below in action.
Configuration involves two steps:
- Creating the config doc used by View Definitions (adminConfig.xsp)
- Creating the first View Definition which is used to display all View Definitions (adminViewDefinitionDoc.xsp)
The first element we are going to work with is the adminConfig XPage. Open this page in your browser.

The purpose of this XPage is to store some basic configuration information that is used when creating View Definitions.
- Rest Service Path – this is the path (<dir>/<database.nsf>) where you will create rest services to retrieve data. If you leave it blank then the control will look in the current database to find rest services.
- Servers – The list of servers that contain databases with views you need to create View Definitions for. This list populates a dropdown on the adminViewDefinitionDoc XPage. Leave blank if you only need to use the current server.
- Databases – The list of databases with views you need to create View Definitions for. This list populates a dropdown on the adminViewDefinitionDoc XPage. This becomes important if you are separating your data from your design.
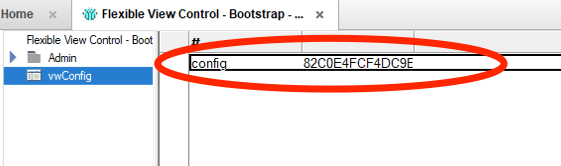
Click the Save button. A Notes document is created. Verify it is there by looking in the vwConfig view. Now, any time the adminConfig XPage is opened the created doc will be automatically loaded.
Creating the first View Definition
The first View Definition we’re going to create will be to display …. the list of View Definitions. Is your head spinning yet? From the adminConfig XPage click the Create View Definition button.

The adminViewDefinitionDoc XPage opens:

There’s quite a bit to unpack here so let’s start with the basics so we can see what the results look like.
| View Definition | This is the “key” for this view def and should be a unique value. It’s also a good idea to make it url friendly as we will see in future posts. I am calling this view-definitions. |
| Use Rest Service | This value should match the “path-info” of a Domino REST Service control. This is only needed if the value above is different than the path-info of your REST service. I’m leaving this blank. |
| Use Rest XPage | This is the XPage where the REST service for this View Defintion is located. The database comes with a restServices XPage so I enter that value here. |
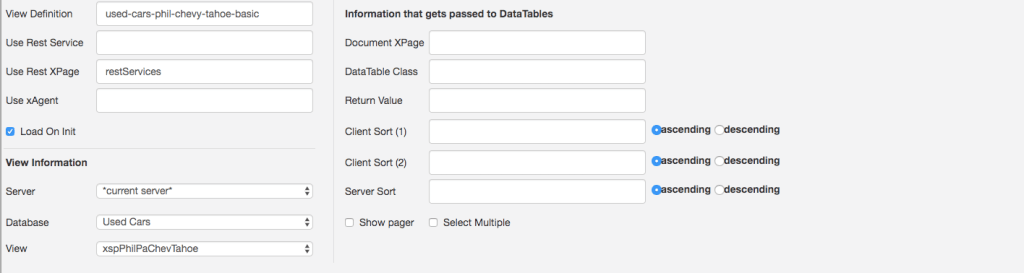
| Load On Init | When checked, this tells the control to load the view as soon as the control is loaded. Since I want my view to load right away, I select it. |
| Server | This is the list of servers we defined on the adminConfig XPage. I select *current server* |
| Database | This is the list of datbases we defined on the adminConfig XPage. I select *current database*. |
| View | Since I’m creating the “View Definitions” View Definition, I choose that view. (I really didn’t want to write View Definition for a 3rd time. Crap, I did it anyway) |
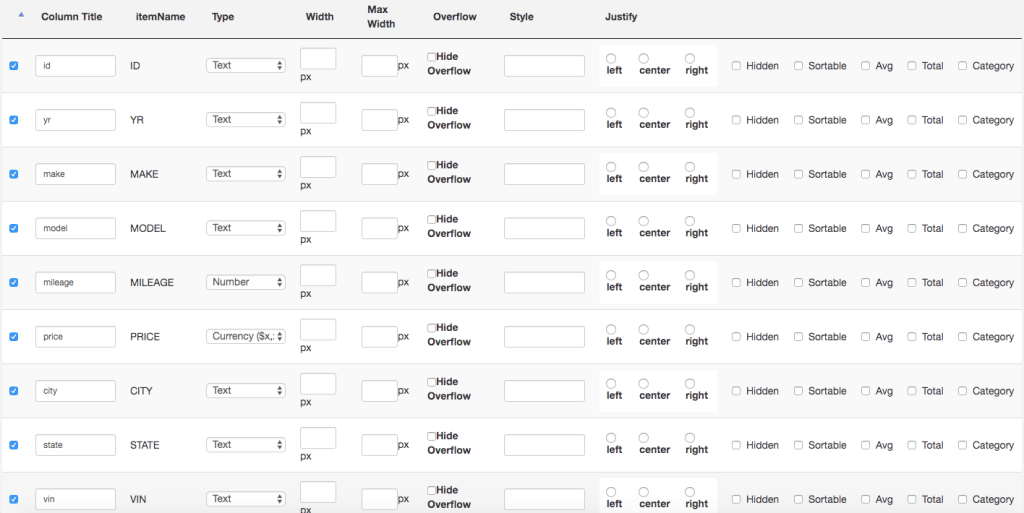
After selecting the View in the dropdown, all of the columns show up below. Now I can start to configure how the view will look. For my example, I’m select all of the columns except the last one.

The FVCX database comes with an XPage adminViewDefinitions that is used to show all View Definitions in the application. This page has the custom control already dragged onto it and configured to point to our view-definitions view def we just created:

When creating the View Definition above, we told it that our REST service was located on the restServices XPage:

Back to the View Definition… When I click the Save button , I’m automatically redirected to this XPage. Here is what it looks like:

We are off and running with the Flexible View Control. In the next post we will start working with some “real” data.
A Flexible View Control for XPages Part 1 – Introduction
Posted: December 4, 2019 Filed under: Custom Control, DataTables, Domino, JavaScript, jQuery, XPages 4 CommentsIn my last post, I stated I would be expanding on the topics from my session “Real World XPages” at Collabsphere 2019.
The first topic is A Flexible View Control for XPages, a custom control integrated with jQuery and DataTables that once added to your design (along with it’s companion elements) can easily be added to any XPage and connected to back-end Domino data in minutes through a Domino REST Service or an XAgent.

Why was this created?
- Frustration with the available tools in XPages for displaying view data. Anyone that has tangled with a View Panel knows exactly what I’m talking about.
- Efficiency in development by avoiding recreating the same code over and over again. When I make a change to the design of this control all of the views created with it get the update immediately.
- To minimize view overhead. One view can be reused over and over which minimizes the number of view indexes that need to be built and maintained. Say goodbye to creating a view just because you need to show your data sorted by a different column!
This tool has been battle-tested in production for 4-5 years with every view and embedded view in our huge XPage application utilizing this control to surface data. Over those 4-5 years it has grown and evolved to be extremely flexible and capable of handling many different use cases. It has been, without a doubt, the single most important piece of functionality in our application as it has been leveraged over and over again to surface data.
At CollabSphere Andrew Davis of HCL stated that “XPages is still the recommended technology in the Domino stack to modernize applications” (paraphrasing). Obviously, this could change with Domino V11 and beyond. But wIth the recent chatter about XPages and the desire many still have to continue creating and enhancing applications, my hope is others will find the value in this tool that I have.
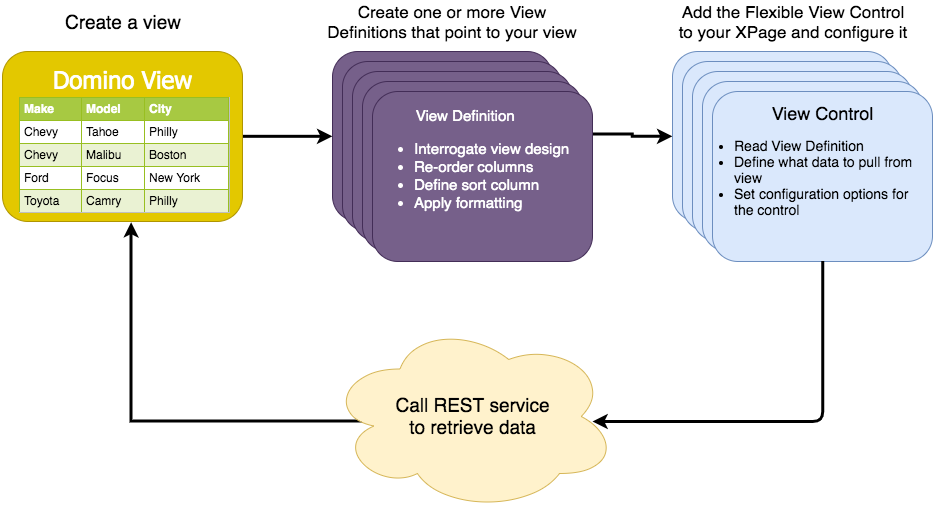
How it works
- View Definitions are the ‘wiring’ for the Flexible View Control.
- They are stored as Lotus Notes Documents and act as the View design for the Flexible View Control. This moves much of the management of views out of the actual design element.
- One View can be represented many different ways with different sorting, column orders and even categorization.
- The Lotus Notes View simply acts as a table of data served via REST services.
- View rendering is done client side with DataTables.
How to get the code
The Flexible View Control for XPages is available on github:
https://github.com/michaelgsmith/datatables-xpages
Here you will find detailed descriptions of the project assets and custom control properties. Before diving in, I highly recommend absorbing the next few blog posts which will detail and explain how to get everything set up and demonstrate how to make effective use of the control.
Note:
- The included theme loads jQuery and DataTables from a public CDN
- The out-of-box UI is very plain to make it easier to integrate with existing projects
- While Bootstrap is not required, the control is already equipped to integrate with Bootstrap
Demos
Stay tuned for Part 2 (and beyond) where I will demo how easy it is to get the database/control setup and connected to data!
CollabSphere 2019 Slides
Posted: November 11, 2019 Filed under: Uncategorized 1 CommentA short few weeks ago at CollabSphere I was fortunate to have the opportunity to present some functionality that I use everyday in the development of the XPage application that powers our entire business.
The session was titled “Real World XPages” and the presentation is now on Slideshare:
In the coming days and weeks I will be expanding on the topics in the presentation (and adding others) as well as making the code and demos available.
Easy Kanban Silos in XPages
Posted: March 28, 2019 Filed under: XPages | Tags: Kanban 5 CommentsRecently, I came across this post on the #dominoforever ideas forum:
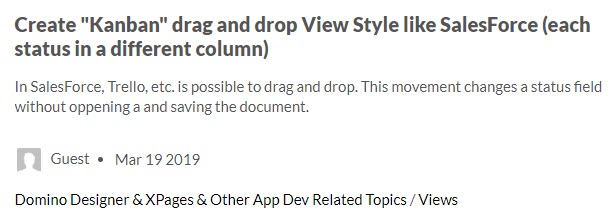
My assumption when reading this is that the OP would like to have this capability in a web application since it’s in the XPages category. Having done something similar in a previous project, I had some code I could dust off to create a quick demo to show how easily functionality like this can be implemented now in XPages.
The project had “silos” that allowed exactly for what the OP is asking for – drag from one column to another while updating the back end such that when the page is refreshed the “tiles” appear in the correct column. Each tile represents one Notes document. I took that, changed a few labels, and called it Kanban Silos:

Take a look at the working demo and drag and drop from one column to another. Refresh the page and you’ll see the changes are reflected on disk. (Note: If multiple people are accessing the demo at the same time the backend may not appear to be updating properly)
How does it work?
- Start with an XPage that contains the structure of the silos (includes Bootstrap and jQuery)
- Get data from a view via REST
- In the ajax callback place the data in the appropriate column based on the status field
- Drag and drop tiles between columns
- Once the drag is complete, call another rest service that updates the Notes document in the back end
That’s it!
The Code
If you are using source control in Domino Designer you can get the On Disk Project from GitHub.
Or, just go ahead and download the whole demo database.
Update 3/29
Initially, this was a quick demo – silos.xsp contained hardcoded silos in raw html. To make things more Xpage-y, I’ve modified the demo database so that silos.xsp now contains a repeat that looks up to a keyword.
Beware the lotus.domino.UserID error in Domino 9.0.1 FP8/FP9 and other upgrade musings
Posted: November 30, 2017 Filed under: Uncategorized 4 CommentsOver the weekend we upgraded our production Domino servers to get to 9.0.1 FP9 HF139(64-bit) & HF137 (32-bit). Well, we “tried” to upgrade the servers.
Then all hell broke loose.
Here’s what we did:
- Server1
- Primary XPages server with NIFNSF enabled.
- Upgrading from FP8 HF174 to FP9
- Upgrade failed with error “Installer found the incorrect version…”.
- Server2
- Backup XPages server.
- Upgrading from FP6 to FP9.
- Upgrade failed with error “Lotus Notes/Domino or a Notes/Domino related process is still running”.
- Booted into Safe Mode and installed FP9 and HF62
- Upgrade to FP9 HF137 failed with error “Installer found the incorrect version…”
- Applied JVM Patch 1_8SR4FP10
- Server3
- Emergency XPages server.
- Upgrading from FP1 to FP7 (in the event there were issues with FP8/FP9 – this ended up being a saving grace)
After upgrading Server2 and attempting to upgrade Server1, both servers started throwing the following exception when attempting to open any Xpage with a document data source:
javax.servlet.ServletException: java.lang.NoClassDefFoundError: lotus.domino.UserID
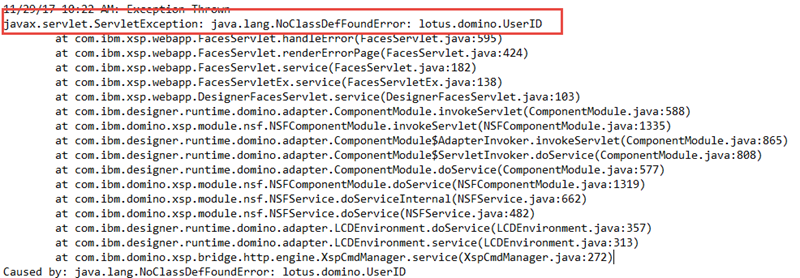
The only reference I could find to this specific issue was from this question on server fault.
In addition, Server1 started crashing any time we opened databases in the Notes client and started throwing long held lock dumps … over and over and over again:
Not sure if this was being caused by NIFNSF being enabled on the server? Watching the view indexes on disk, the server was leaving 100s and then 1000s of temp .ndx files on disk as the server crashed over and over again.
Luckily, we intentionally upgraded Server3 to only FP7 in the event that we had issues with the other servers. This saved our ass as we were able to point our users to this server with minimal interruption as we dealt with the issues above.
We were finally able to get Server1 & Server2 upgraded to FP9 HF60.
Here is what we learned in the process:
- If you are receiving the exception “javax.servlet.ServletException: java.lang.NoClassDefFoundError: lotus.domino.UserID” when opening an XPage with a document data source, then the JVM is probably hosed. Once we were able to successfully upgrade to FP9 HF60 then everything was fine, but it doesn’t explain why this issue started on a server where the upgrade process failed initially.
- If, when trying to install a fixpack/hotfix you get the message “Error installing Domino Fixpack: Installer found the incorrect version. . .” then you probably need to install the base version of Domino, in our case 9.0.1 and then the FP you are trying to get to plus the HF you are trying to get to. This is detailed in this technote.
- If, when trying to install a fixpack/hotfix you get the message “Lotus Notes/Domino or a Notes/Domino related process is still running…” then you may need to disable the “Windows Management Instrumentation Service” in the Services list of the server. We PAUSED the service and successfully upgraded the server. See this technote.
Questions from the DataTables Webinar
Posted: October 18, 2016 Filed under: Uncategorized Leave a commentLast Tuesday I presented a Webinar on using DataTables with XPages which was hosted by TLCC and Teamstudio. There was a Q&A at the end of the session, but unfortunately due to time constraints we did not get to all of the questions and kind of rushed through the questions we did get to. So I wanted to dedicate a blog post to answering all of the questions that were submitted. Here we go!
Q1: (Submitted by Jena Chinmaya) – Can we use Data table of this format on a regular non xpage classic notes web database ?
A1: Absolutely! A lot of the concepts that were discussed would still apply in a classic Domino Web scenario. The big question that would have to be answered is, how is your data being delivered from the back end to the front end? If you are using a more recent version of Domino (say, 8.5.3 or greater) then you can create an XPage with a REST service control. If you are using an older version of Domino, then you still have a few different options:
- Using a $$ViewTemplateDefault form to display the view. This would be similar to using a xp:repeat in XPages since you would be applying DataTables to an existing html table of data. I created a quick demo so you can get an idea how this would function.
- Use an agent to deliver view data via REST
- Use ajax to get data using the ?readviewentries&outputformat=JSON option of a view url. This method would require some additional work in DataTables to read the data.
Q2: (Submitted by Chris Richards) Could you, using REST services – create one custom control, which you can drop anywhere, and just pass in a cusotm property, namely a view name so that it can be drag/dropped/re-used all over an application with ease?
A2: This can definitely be accomplished and is a great way to make adding view data as simple as drag and drop. I essentially do this now through an extremely configurable custom control. The key to success is making sure that the columns object gets properly defined if you are using JSON data. I hope to make my solution available in the very near future and I’m contemplating a “light” version that I can get out quicker.
Q3: (Submitted by Csaba Kiss) Do you see any performance difference using custom REST service vs standard JSON REST?
A3: While I have not done a direct performance comparison of these REST services, I think it’s reasonable to assume that the more “custom” the custom REST service is, the more it will slow down vs the standard REST service. For example, if while processing each row you are looping through column values to perform actions, you can certainly expect a performance hit. If the custom REST service is just traversing a view, then I would expect the performance to be similar to the standard REST service.
Q4: (Submitted by Jen Watkins) how does one format dates? The format that comes back by default from DataTables is crazy.
A4: I think the format you are referring to is the ISO-8601 format, which you can see in the screenshot below. Actually, this format is being delivered by Domino. You can see this at the bottom of the screenshot in the REST response.
There are a few ways to deal with this:
- When working strictly with dates, my personal preference is to just format the column as text in the view. DataTables recognizes the value as a date and column sorting will work appropriately.
- You can use a renderer to format the date to your preferred format. Here is a great post on the DataTables website demonstrating how to do so. This post references the moment.js library. I use this library as well and it makes working with dates incredibly easy, especially when doing date comparisons.
Q5: (Submitted by Jen Watkins) To filter data before it is returned, for example to return only the data that a particular user is allowed to see, do you have to use the CustomRestService as opposed to the ViewJsonService?
A5: The answer to this question depends on how you have security setup in your application. If your users are authenticating and they are calling REST services that are retrieving data from databases that require authentication, then the appropriate records will be returned based on Domino security.
On the other hand, if you are no so much concerned about security, but want to only show, for example, documents that are assigned to the current user, you can sort or categorize your view on the back end and submit the “keys” attribute with the REST service and the dataset returned will be filtered. You can actually get very creative with using categorized/sorted views to get away from the old Notes habit of having a different view for every different categorization/sort.
Q6: (Submitted by Kevin Gregg) What if you needed to combine data from multiple views into one DataTable – what is a good method of doing that?
A6: When answering this question during the webinar I may have misunderstood the intention of the question so I will answer it in two ways. This question can be interpreted in 2 ways:
- You want to add additional rows – I actually do this a lot. We have 2 databases that store almost identical information. In classic Notes land, we would have to show separate views and embedded views when displaying this information to the user.With DataTables it is very easy to combine data sets, as long as the configuration of the data sets match. What I do is load the initial data, then in the initComplete callback I make an ajax call to the 2nd set of data and then use the add rows functionality of DataTables to merge the data:
initComplete: function() {
// Check for any other data sets that need to be added to the table
$.ajax({
    type: 'GET',
    url: <url to REST service>,
    contentType: 'application/json',
    dataType: 'json',
    cache: false,
    success: function(response) {
                var vTable = $(dataTableClass).DataTable();
                vTable.rows.add(response);
                console.log("init adding records");
                console.log("initComplete draw()")
                vTable.draw();
   }
});
}
- you want to add additional columns – This is akin to having a xp:repeat control and having a column where you perform a @dblookup to another set of data based on information in the original set. For this scenario, the best course of action is probably to use a custom REST service or an XAgent to build the data set on the back end and deliver the completed set to DataTables.
However, you could also accomplish this in DataTables. In your original data set you could have one or more empty cells acting as placeholders. Then, similar as in #1 above, in your initComplete callback you can make an ajax call to another set of data and then using a shared key between the two, insert the retrieved data into the DataTable. I will try to work up an example of this once I can find a few minutes.
Q7: (Submitted by Miguel Angel) How I can lock a document from a datatable to prevent the save replication conflict? How I can show a online message from a Datatables, when a customer made a change at that moment?
A7: The lack of Document locking was certainly one of the early complaints of XPages. Ultimately, people worked around it or rolled their own document locking mechanism. Some of the solutions out there include:
- An OpenNTF project from Frederick Nordling
- This post from StackOverflow
- In our environment, we created our own document locking solution. We needed to do this because we had users that were updating documents in the Notes Client as well as our XPages application.
To relate this to DataTables, if you want to initialize a lock from DataTables, you can do this by adding an onclick or ondblclick event that submits information, such as docid, to a REST service. To release the lock, you would do the same.
To answer your 2nd question, I’m assuming you want to update the current user if data they are looking at was changed in the back end by someone else. Here’s what I think the simplest solution is:
- Add a setInterval to the initComplete callback that retrieves the REST data (or maybe just retrieves a column with date modified value).
- Loop through each record and compare the values to the original DataTable (or compare the date modified column).
- If there is a difference, notify the user. If you are using Bootstrap you can use the alert classes to display a message above the table, for example.
Upcoming Webinar: XPages and jQuery DataTables
Posted: October 4, 2016 Filed under: Uncategorized 6 CommentsJoin me next Tuesday, October 11th for a webinar sponsored by TLCC and Teamstudio – “XPages and jQuery DataTables – Simplifying View creation while maximizing functionality”
In this webinar I will show you how you can use DataTables to create rich, functional views, which is especially relevant if you are modernizing or rebuilding an existing Notes application. While the title references XPages, it is not a requirement. DataTables is compatible with any back end that can deliver data via REST.
You can register here:
https://www.tlcc.com/admin/tlccsite.nsf/pages/xpages-webinar?opendocument
I hope to see you there!
